
Dehydrated Figs- How to make dried figs with a dehydrator
Long weekends are the best, aren’t they?! A few weekends ago my sister and I took our kids out to Hillside Harvest. A local orchard and farm store, about 10 minutes out of Orange, NSW at Borenore. Large fig trees full of delicious ripe fruit, line their car park full of different varieties of figs. We came home with baskets full of fresh, local, Autumnal produce just ripe for preserving. Hello dehydrated figs!

If you’re new here, you might not know I also run a small online store where I keep many of the tools I cook with every day, along with a few timeless homewares for good, slow living…
Picking fresh figs from the tree would be one of my favorite things to do in the garden over Autumn. While fig trees are one of the few fruit trees to fruit twice a year, our first crop is never substantial. We have a small brown turkey fig tree in our garden, but this year our Autumn fig season only gave us a couple of figs. Great to munch on while picking, but not enough for a solid batch of anything. After our road trip, I was again well-stocked and ready to preserve.
What you need to get started drying figs
- Lots of fresh, ripe figs! Drying figs in a dehydrator is super easy. I slice my figs for dehydrating, however, you could also try drying them whole or in quarters. You would need to change the length of time you are dehydrating though. The reason I prefer slicing them is that they are easy to snack on and eat, especially when I add them to my Spiced honey nut granola that I eat most mornings for breakfast. Another way to use dried figs is by adding them to your next cheeseboard. They pair really well alongside a cracker and slice of creamy brie.
- Dehydrator. I used to be one of those people who didn’t think they needed a food dehydrator until I got one! Now I use it so much. They are so handy when you grow your own fruit and vegetables. Even if you only have a small plot like us, they are worth their weight in gold. We dehydrate everything from strawberries to citrus fruit, but just to be able to dehydrate any excess garlic for winter before it all sprouts is a total game-changer. The drying process with a dehydrator is really simple, so while you can dry figs on a wire rack in an oven or even an air fryer, a benchtop dehydrator is my drying vessel of choice.
- You’ll also need a sharp knife and chopping board to prepare your figs.
How to dry figs using a dehydrator
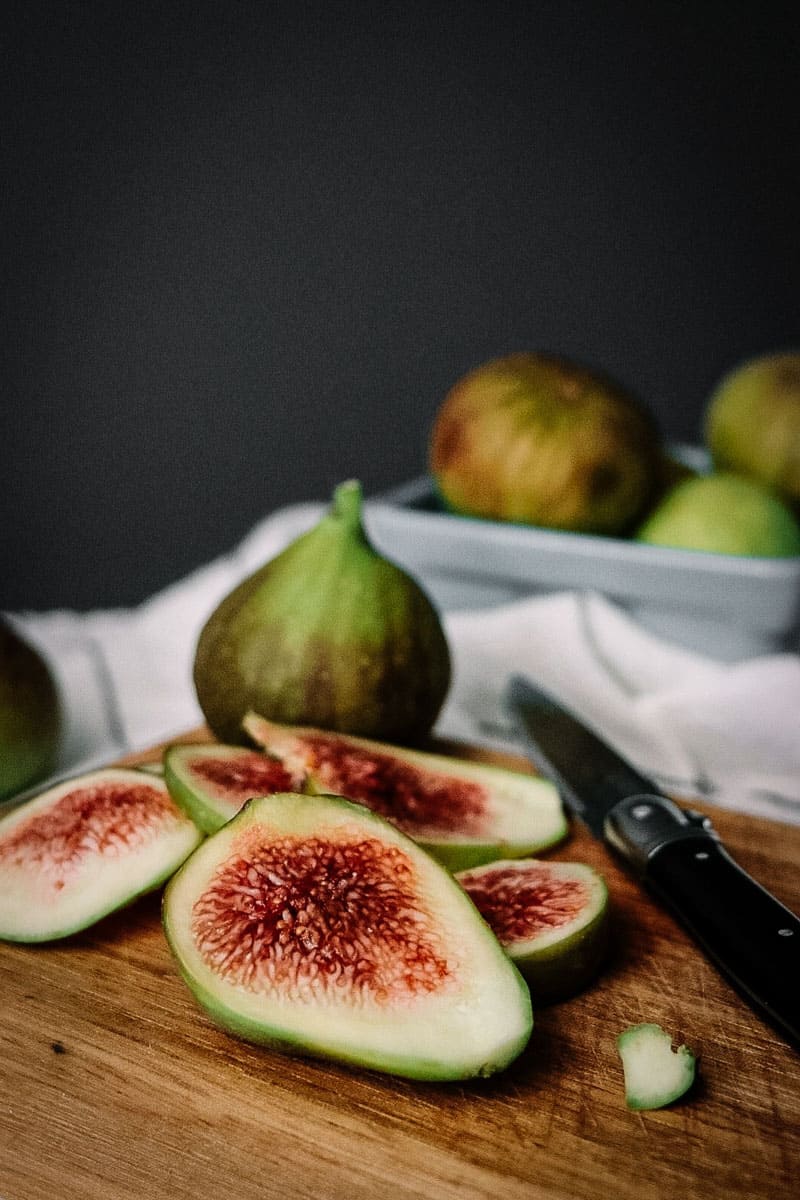
- Wash the figs in cold water and dry with paper towel.
- Remove the top stem from the fig. Slice each fig into 3-5mm slices.
- Lay fig slices flat in a single layer on the dehydrator trays. Make sure they aren’t touching each other to ensure proper air circulation.
- Turn the dehydrator on to the lowest temperature or dried fruit setting and leave to dry for 8 hours – 10 hours.
- Once cool. store in an airtight container.
Cooks Notes
The size/thickness of the figs will determine how long they need to be dried. Larger figs will need a longer dehydration time than smaller figs. On average my slices take 8 hours. I generally pop them on just as I’m going to bed and they are done when I wake up the next morning. However, drying time really depends on the size of the fig slices, so if you are unsure, check your figs after 8 hours and adjust the time if needed. Leave to cool and place figs in an airtight container.
Please note, that whole figs or quartered figs will take longer to dehydrate as it takes longer to remove all the moisture.
How to store dehydrated figs
The best way to store dried figs is simply in an airtight container like a glass jar, out of direct sunlight, preferably in a dark place like a pantry or preserving cupboard. I use Kilner preserving jars to store my dried fruit. The clip-top jars with a rubber seal are great for keeping food airtight and it’s really easy to see if any moisture develops.
You can also add a food-grade silicon sachet to the jar to help absorb any moisture that may develop with long-term storage.
The shelf life of dehydrated figs is 6-12 months, although mine never last that long!
Here’s how I use dried figs…
- To snack on. They make an excellent snack in lunchboxes with their sweet, nutritious, sugar-free flavor. Delicious and healthy. It’s a win-win!
- Figs are an amazing source of vitamin c, so try making your own trail mix with some nuts, seeds, and dried fruit for a vitamin pick me up!
- Add them to your breakfast cereal, morning oatmeal, or better yet, homemade granola.
- Figs are the perfect accompaniment to so many cheeses. Scatter a few on your next cheeseboard.
- Make a quick spiced sugar syrup and infuse the figs to go alongside a panna cotta or decorate a pavlova with.
A bit about food dehydrators
With the right equipment, dehydrating is one of the easiest ways to preserve fresh produce. While you can totally make dried fruit in the oven, I find a simple dehydrator is super easy to use and gives a tasty, consistent result. My dehydrator is a Fowlers Vacola ultimate dehydrator. I’ve also used the Cuisinart dehydrator. It’s a really good entry-level option. It’s a bit smaller than my Fowlers Vacola, but it works well and is a great option if you are just starting out.
Preserving this season’s harvest? Here are a few more recipes you might like…
- Lemon and Passionfruit Curd
- Balsamic Fig Jam
- Slow Roasted Tomatoes
- Why you need to dehydrate citrus this winter (and how to do it!)
- How to make dehydrated strawberries
x


Start slow. Cook confidently.
Cast Iron Cooking 101
From slow cooked stews to warm bread fresh from the oven, this guide will help you feel confident cooking with cast iron at home.

Dehydrated Figs
- Prep Time: 10 minutes
- Cook Time: 8 hours
- Total Time: 8 hours 10 minutes
- Yield: Lots of fig slices!
- Category: Anytime
- Method: Preserving
Description
Snack on these sugar-free dehydrated fig slices or add them to your morning granola mix!
Ingredients
- Figs
Instructions
- Wash and dry the figs
- Remove the top stem off the fig. Slice each fig into 3-5mm slices.
- Lay fig slices flat on a dehydrator tray.
- Turn the dehydrator on to the dried fruit setting and leave to dry for 8 hours.
- Once cool. store in an airtight container.
Notes
The size/thickness of the figs will determine how long they need to be dried. On average my slices take 8 hours. I generally pop them on just as I’m going to bed and they are done when I wake up the next morning


Love these in my morning with my cereal!